A final year project timeline is a dated plan that works backwards from your real submission date: you fix the last step first, then place printing, formatting, supervisor corrections, writing and data collection before it, with a buffer for delays. A Gantt chart is simply that plan drawn as bars across weeks.
If your plan is ready, UniDraft can help you organise your confirmed work, checked sources and supervisor instructions into an editable Word project document as chapters come together; you can start your project document when you have material to organise. It does not run your research or invent results, and every schedule on this page is fictional.
On this page: the work-back method, a fictional six-month plan and Gantt figure, a fictional three-month plan, how to size buffers, milestones, and the mistakes that sink timelines.
The short answer
- Start from the date you must submit, not from today. Count back.
- Protect the end of the plan first: printing, formatting, references, then supervisor corrections.
- Show waiting time separately. Your supervisor's reading time is not your working time.
- Put a visible buffer after data collection. That is where plans most often slip.
- Mark milestones you can check, such as "proposal approved" or "Chapter 3 returned".
- Revise the plan as you go, and keep the original so you can see why it changed.
- Do not state or assume a deadline. Get your department's dates in writing from the coordinator or handbook.
Why a timeline matters more than it seems
Most project problems are not about ability. They are about time that disappeared in the middle. A literature review that takes six weeks instead of three, a questionnaire that waits for approval, a supervisor who is travelling: each is ordinary, and each eats the weeks you meant to spend writing.
University study-skills guides agree on the basic move. The University of Westminster's dissertation planning page suggests breaking the project into stages such as the literature search, reading, data collection and writing, setting a date for each, and leaving time at the end for redrafting, proofreading, formatting and the reference list. The University of St Andrews makes the same point about starting from the due date and working backwards. These are UK guides written for their own students, so take the method, not the dates.
If you want the order in which chapters are usually written, our step-by-step guide to writing a final year project gives a generic 16-week outline. This page does something different: it teaches you to build your own schedule from your own deadline, whether you have 12 weeks or 28.
What is the work-back method?
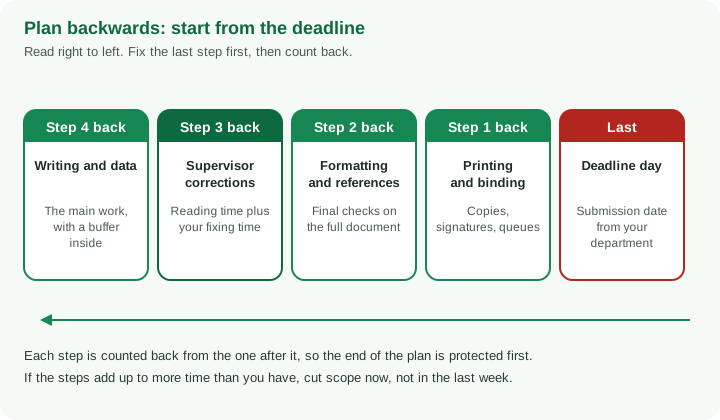
The work-back method is a way of building a schedule from the end instead of the start. You begin with the date that cannot move and ask, at each step, "what must be finished before this?"
Step 1: Get the real dates
Ask your project coordinator or read your department's project handbook for the submission date, any defence or presentation date, and any interim deadlines such as a proposal or a progress seminar. Write them down with the source. Do not rely on a senior student's memory of last year's calendar, because dates change between sessions.
Step 2: Count back the fixed tail
Starting from the deadline, reserve the stages at the end that you cannot rush:
- Printing, binding and signatures, if your department requires hard copies. Queues are longest just before deadlines.
- Formatting and the reference list. For university-specific layout, follow your department; the format pages and the free formatter exist for that, and this guide does not set formatting rules.
- Supervisor corrections. This is two different blocks of time: how long your supervisor takes to read, and how long you take to fix. Count both.
Step 3: Place the main work before the tail
What is left is the time for the real work: planning, reading, method, data, analysis and writing. If this block is shorter than you hoped, that is the plan telling you something true. Better to find out in week one than week twelve.
Step 4: Add overlap, then add buffer
Tasks do not run strictly one after another. You can read while you design the instrument, and you can draft the methodology while you wait for approval. Overlap saves time, but only for work that is genuinely independent. You cannot analyse data you have not collected. Once the overlaps are in, place a buffer, covered below.
Step 5: Check it against the whole
Add up the stages. If they exceed the weeks you have, cut scope now. A narrower objective list, a smaller sample you can reach, or a simpler build is a decision you can take to your supervisor. A missed deadline is not.
A fictional six-month timeline (24 weeks)
Imagine a student, call her Ada, with 24 weeks between approval to start and the submission date. This is an invented example to show the shape of a plan. It does not say that 24 weeks is the right length, and it describes no real study.
| Weeks | Stage | Output you can check | Waiting on someone else? |
|---|---|---|---|
| 1-3 | Topic, outline, supervisor approval | One-page outline signed off | Yes: supervisor |
| 3-10 | Search and read the literature | Source log and notes | No |
| 4-7 | Method, instrument, permissions | Instrument drafted, access letter sent | Yes: approval or access |
| 9-14 | Data collection or system build | Collection log or working build | Often: respondents, equipment |
| 15-16 | Buffer for data delays | Nothing planned; absorbs slippage | |
| 14-18 | Analysis and results | Tables or findings drafted | Maybe: supervisor check on method |
| 18-20 | Discussion, conclusion, introduction, abstract | Full draft | No |
| 20-22 | Supervisor review and corrections | Returned comments, revised draft | Yes: supervisor |
| 22-24 | References, formatting, printing, submission | Final document | Yes: printing and submission |
The same plan as a Gantt chart:
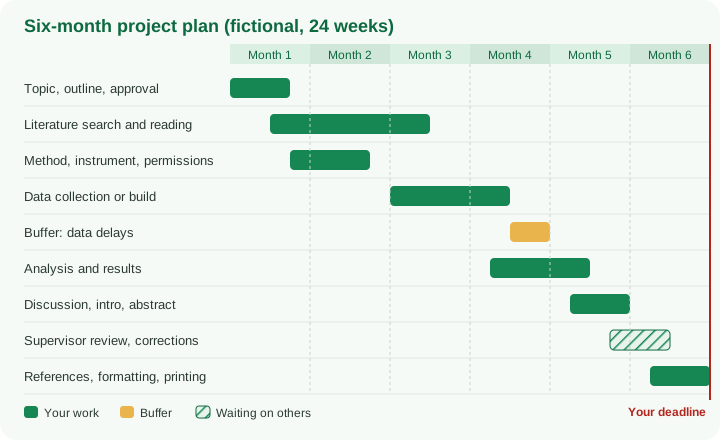
Three things to notice. Reading overlaps topic approval and method design, because you can start reading the moment the topic is roughly set. The amber buffer sits directly after collection, not at the very end. And the hatched block, supervisor review, is drawn differently because it is time you do not control.
A fictional three-month timeline (12 weeks)
Sometimes you do not get 24 weeks. A project may be started late, or a department may run a short project window. Here is a compressed version for an invented student, Tunde, with 12 weeks. Again, this is illustrative: whether 12 weeks is enough depends on your project, and a narrow scope is what makes it possible.
| Weeks | Stage | Output | Note |
|---|---|---|---|
| 1 | Topic and outline fixed with supervisor | One-page outline | Do this in week one, or nothing else can start |
| 1-4 | Focused reading and method draft | Short source log, Chapter 3 draft | Read only what the question needs |
| 3-4 | Permissions and instrument ready | Approved instrument | Send requests immediately |
| 4-7 | Data collection or build | Collection log or working build | Use only data you can reach |
| 7-8 | Buffer | Absorbs delays | Shorter, so the sample must be reachable |
| 7-9 | Analysis, results, discussion | Chapters 4 and 5 draft | Write results as they come |
| 9-10 | Introduction, abstract, references | Full draft to supervisor | Send chapters earlier if allowed |
| 10-11 | Corrections | Revised draft | Agree a quick turnaround in advance |
| 11-12 | Formatting, printing, submission | Final copy | Do not leave this to the last day |
A shorter timeline does not remove stages; it removes slack. That is why the scope must shrink with it. If a proposal promises a large survey in three months, the buffer is the first thing to vanish and the plan breaks at the first delay.
How much buffer do you need?
There is no number that fits every project, and no source I opened gives a universal figure. What the guides do say is that plans should include contingency and be reviewed. The University of Southampton's research methods pages recommend a fallback plan for when things do not go to schedule, which reduces stress and the chance of missing the deadline.
A practical way to size it:
- Ask your supervisor how long they usually take to return comments on a chapter, and plan for the slow end of the answer, not the fast end.
- List the stages that depend on other people: respondents, a lab slot, a company giving access, a committee approving an instrument. Each one gets more buffer than a task you do alone.
- Put the biggest buffer after data collection. Respondents do not reply on schedule, and equipment fails at inconvenient times.
- Keep a small second buffer before the deadline, so a printing queue or a power cut does not decide your result.
If you collect data through forms, see the guide to data collection methods for how to plan the collection window and what to record while it runs.
Planning for supervisor feedback
Supervisor feedback is the most underestimated item in student timelines. It has two parts that students often merge: the reading time (outside your control) and the fixing time (inside it).
Write both into the plan as separate blocks. Then do three practical things:
- Agree the submission method early (email, shared file, printed copy) and ask how long they normally need.
- Send work in pieces if they allow it. One chapter returned in a week is far better than all chapters returned in a month. Our guide to managing supervisor corrections covers how to track and respond to comments without losing versions.
- Plan something else to do while you wait, such as reading, formatting the front matter or preparing the next chapter, so waiting time is not wasted time.
If your supervisor is slow, say so early and politely, with the date you sent the work. Do not wait until the final week to ask.
Planning for data collection delays
Data collection is where a smooth chart usually meets reality. A questionnaire needs approval before it goes out, respondents answer late or not at all, and a build waits for a component or a stable connection.
Protect yourself with a few habits:
- Send permission and access requests at the start of the plan, not when the collection stage begins. Approval often takes longer than the collection.
- Run a small trial first. A short pilot shows whether your instrument works before you commit the whole window. The pilot study guide explains this.
- Define a stop rule in advance. Agree with your supervisor what you will do if responses are fewer than hoped, so you do not decide it in a panic.
- Never fill the gap with invented data. If you fall short, report the real count and explain the limitation. Fabricated data is the one mistake no timeline can fix.
If your study involves people, check the requirements in the research ethics and consent guide early, because approval is a dependency, not a formality.
Milestones that make the plan checkable
A milestone is a point you can verify, not a feeling. "Finished reading" is vague. "Source log of the studies I will use, shared with my supervisor" is checkable. The Southampton page suggests organising a dissertation timetable around stages such as agreeing the proposal, gaining ethical approval, finishing the literature review, running a pilot, collecting and analysing data, and writing drafts, and agreeing it with your supervisor.
A sensible milestone list for most projects:
| Milestone | How you know it is done |
|---|---|
| Topic and outline approved | Supervisor confirms in writing |
| Proposal accepted | Where required, department confirms |
| Permissions or access secured | Letter or message on file |
| Instrument or design approved | Supervisor sign-off on the version you will use |
| Data collection closed | Collection log complete, count recorded |
| First full draft | Complete document sent to supervisor |
| Corrections returned and applied | Revised version saved with a new version number |
| Final copy ready | Checked against your department's own requirements |
Mark each on the Gantt chart as a dot or a diamond. If a milestone date passes and it is not met, that is your signal to adjust the plan that week, not at the end of the month.
How to build the chart in Word or Excel
You do not need special software. A simple method that works in Word or Excel:
- Write the tasks down the left column.
- Put weeks (or months) across the top row.
- Shade the cells from each task's start week to its finish week.
- Use one colour for your own work, a second for buffer and a third (or a pattern) for time spent waiting on others.
- Add a vertical line at the deadline and at any defence date.
- Save each revision with a version number rather than overwriting.
The Westminster guide mentions that free online planners and Word or Excel can all do this, so use whatever you can open on your phone or in a cyber cafe. If your department supplies a template, use it and follow its labels.
If you are writing a proposal, the timeline is usually one short section of it. Our guide on how to write a final year project proposal shows where it fits, and a compact version of the six-month table above is often enough.
Mistakes that sink timelines
- Starting from today, not the deadline. You fill the first weeks generously and run out at the end.
- Treating supervisor time as zero. Feedback takes days or weeks, and it sits on the critical path.
- No buffer, or a buffer hidden at the very end. Slippage happens mid-plan, so the cushion must be there.
- Scheduling tasks that depend on approval before approval exists. Data collection cannot start on week 4 if the instrument is approved in week 6.
- Overlapping dependent tasks. You cannot write results before you have data. Overlap only what is independent.
- Planning a scope that needs the whole time. If every stage is at its minimum, any delay breaks the plan. Narrow the scope first.
- Underestimating formatting and printing. These tail stages are fixed and often crowded.
- Copying another student's chart. Their question, access and capacity are not yours.
- Never updating the plan. A chart that is not revisited is a poster. Check it weekly and record what actually happened.
- Hiding a delay. Telling your supervisor in week 8 is manageable. Telling them in week 22 is not.
For the consequences of leaving problems until the end, see what happens if you fail your final year project, which explains why early communication matters.
Questions your supervisor or panel may ask about your plan
- Which stage do you think is most likely to slip, and what will you do if it does?
- What happens to the schedule if respondents or approvals come late?
- Which parts of this plan depend on someone else?
- Is your scope realistic for the time you have?
- How will you know at week 10 whether you are on track?
If you can answer these with specific milestones, you will also find defence preparation easier. The project defence preparation guide covers that stage, and the plan above should include time for it.
A one-page timeline worksheet to copy
| Item | Your entry |
|---|---|
| Submission date (with source) | |
| Defence or presentation date, if any | |
| Weeks available, start to submission | |
| Weeks reserved for printing and submission | |
| Weeks reserved for formatting and references | |
| Weeks reserved for supervisor reading, plus your fixing time | |
| Weeks left for the main work | |
| Buffer after data collection | |
| Milestones and target dates | |
| First thing that could slip | |
| Backup if it does |
Fill the first two rows from official sources, and the rest with your supervisor. Then draw the chart.
Where UniDraft fits
UniDraft does not set your dates or do your research. Once your timeline is running and your chapters are taking shape, it organises your confirmed work, checked sources and supervisor instructions into an editable Word project document, so you spend less time assembling and more time on the content. When you are ready, start your project document. The free citation finder can help you locate and format real sources while you read.
Sources
The method above draws on these planning guides, which I opened. They are UK university pages written for their own students; none of their dates or durations apply to Nigerian departments, so follow your own handbook.