Technical report writing is the skill of telling a particular reader what you did, what you found and what it means, accurately and in an order they can navigate. A good report states the aim, describes the method so it could be repeated, presents results clearly, then discusses and concludes. Your lecturer's brief decides the exact layout.
UniDraft helps organise your confirmed work, checked sources and supervisor instructions into an editable Word document, so your report is built from what you actually did and measured. If your technical report belongs inside a placement report, you can start your SIWES report and bring the records of the task with you. You still run the work, do the calculations and check every claim yourself.
This guide is about the writing of a technical report: lab reports, workshop or design reports, site reports and short engineering write-ups. It is different from the full chapter layout of a placement report, which is covered in how to write a SIWES report, and from a one-page overview, which is covered in the executive summary guide.
What is a technical report, and who is it for?
A technical report is a structured document that communicates the method and outcome of technical work to a defined reader. The work might be an experiment, a design, a test, a survey of a site, or an analysis of how a system behaves.
University guides stress one idea above others: decide who will read it. Guidance from the University of Sussex says that for coursework the readers are usually fellow students and markers, while in professional settings they may be managers, clients or project team members. The reader decides how technical the language can be and how much background the introduction needs.
Three habits follow from this:
- Write for a reader who was not there. They did not see your bench, your site or your screen. If a step matters, say it.
- Let readers stop early. Many people read only the summary, so it must make sense without the rest. Others dip into the method or the results. Clear headings let each reader land where they need to.
- Be accurate before being impressive. A plain, correct sentence beats a long, vague one.
What sections does a technical report usually have?
Guides from several universities describe a broadly similar outline. The Sussex engineering guide, for example, lists a title page, summary, contents, introduction, a main body of numbered sections, conclusions, references, optional acknowledgements and optional appendices. For lab work specifically, its formal-report order is summary, introduction, then theory, equipment, procedure, results and discussion, followed by conclusions, references and appendices.
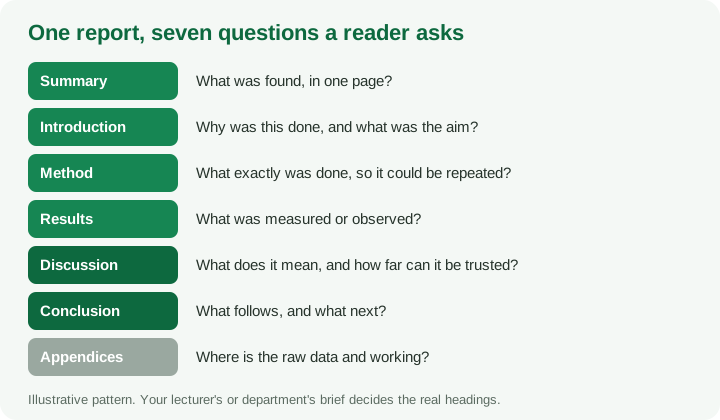
Think of each section as the answer to one question:
| Section | The question it answers | Typical content |
|---|---|---|
| Summary | What was found? | Aim, method in a line, key results, main conclusion |
| Introduction | Why do this? | Background, the problem, the objective |
| Method / procedure | What was done? | Equipment, steps, conditions, safety |
| Results | What was observed? | Tables, graphs, short factual text |
| Discussion | What does it mean? | Interpretation, comparison, errors, limits |
| Conclusion | So what? | Short answer to the aim, next steps |
| Appendices | Where is the detail? | Raw data, long working, code, drawings |
This is a pattern, not a standard. A shorter logbook-style report may drop theory and procedure detail; a design report may replace "results" with "design and analysis". If you have a template or marking scheme, it overrides everything in this article. For university-specific layout, use the format pages or the formatter tool and follow your own department.
Write the sections in a sensible order
The Sussex guide suggests drafting the main text first, then the conclusion, then the introduction, and writing the summary last. This works because you cannot summarise what you have not yet written. Do not agonise over style in the first draft; get the facts down, then revise.
How do I write the method or procedure clearly?
The method answers "what exactly was done?" in enough detail that a competent reader could repeat it, without copying the instruction sheet.
According to the Sussex lab-writing guide, procedure is written in the past tense and kept brief, summarising rather than reproducing the handout. It also says to record difficulties, how they were overcome, and precautions taken. Useful habits:
- Past tense, plain verbs. "The beam was loaded in 20 N steps" rather than "Load the beam in 20 N steps".
- Name the equipment that matters, with ranges or identifiers where your course asks for them (for instance a meter and its range), not every item on the bench.
- State the conditions that affect the result: temperature, sample size, supply voltage, soil condition, software version.
- Say what you did differently from the handout and why.
- Add a simple diagram when words are clumsy. A labelled circuit, set-up sketch or flow diagram often replaces a paragraph.
Weak: "We did the experiment and took readings." Better: "The wire was clamped at the upper end and loaded in equal steps. Extension was read from the scale after each step and the load was then removed in the same steps."
For project-style methods, the methodology chapter guide covers how the same thinking applies to research.
How do I present results without burying the reader?
Results report what was observed. They do not argue about it; that belongs in the discussion.
The Sussex guide suggests putting final results as tables or graphs in the results section, and moving raw data, graph source tables and an example calculation to appendices. Show the formula once, or refer to an equation number, rather than repeating the working for every reading. Then follow three rules:
- Introduce every table or figure in the text. The Oregon State chemistry writing guide calls unexplained data "orphan" data. Say what the reader should notice: "Figure 1 shows that extension rose in proportion to load up to about the fifth reading."
- Keep results and interpretation apart. "Extension increased from 1.2 mm to 6.1 mm" is a result. "This indicates elastic behaviour" is discussion.
- Choose the right display. Sussex advises asking whether a graph or bar chart presents the data better than a table before defaulting to a table. Complicated tables can go to an appendix.
For the project-chapter version of this skill, see the results chapter guide.
How should figures, tables and captions look?
A figure should be readable without hunting through the text. Oregon State's guide asks you to number every figure and table, give each a caption that includes the number and a descriptive title, and label every axis with the variable name and its units. For tables, specify units under each column heading.
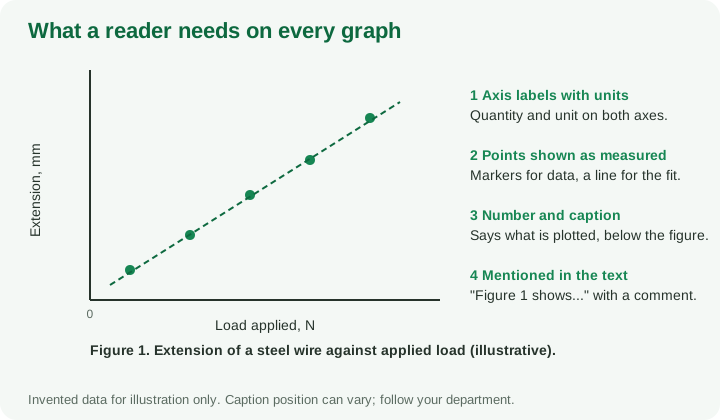
A short checklist for each graph:
- Both axes carry the quantity and unit (for example "Extension, mm").
- Measured points are shown as points; a fitted line or theoretical curve is drawn differently so the reader can tell which is which. Sussex recommends distinguishing theoretical from experimental values this way.
- The caption says what is plotted, not just "Graph of results".
- The figure is mentioned in the text, ideally near where it appears.
Caption position is a convention, not a law. Guides disagree on details, so check your course handout. Sussex also recommends keeping diagrams as simple as the purpose allows. Practical Word steps for numbering and captions are in the figures, tables and captions guide.
Units and significant figures at a plain level
You do not need advanced statistics to avoid the most common errors.
Units. Every measured or calculated quantity needs a unit, in the text, table headings and graph axes. The Sussex guide advises SI units, attaching prefixes directly (kW, mm) and writing unit symbols without a plural or full stop. It also suggests choosing prefixes so numbers sit between 1 and 1000 where practical, for example 102 mm rather than 0.102 m. If your lecturer prefers a different style, follow the lecturer.
Significant figures. Significant figures show how precisely a value is known. Reporting 4.7381 V from an instrument that is only reliable to about two or three digits claims accuracy you do not have. The Sussex guide notes most experimental data is known to about three significant figures at most and warns against "calculator accuracy": copying every digit the calculator shows. It suggests keeping an extra digit in intermediate values that will later be subtracted, then rounding the final answer. Oregon State's guide also asks for table entries with the appropriate number of significant figures, which may mean changing spreadsheet column formats.
Plain rules of thumb:
- Round the final result, not each step.
- Do not report more digits than your instrument and method justify.
- Be consistent within a column.
- If your course gives an error rule, use it instead of these rules of thumb.
What goes in the discussion and conclusion?
The discussion interprets the results. Compare them with what you expected or with a published value, explain unexpected points, and name sources of error (reading error, equipment limits, changed conditions). Be honest: a report that admits a limitation is stronger than one that hides it. The Sussex guide keeps discussion and conclusions as separate sections, and says conclusions should contain no new material.
The conclusion answers the aim directly in a few sentences, mentions the main numerical outcome, and may suggest what to do next. If the aim was "to determine the stiffness of a wire", the conclusion should state what you found, not restate the procedure.
A fictional annotated outline for an engineering task
Below is an invented outline for a short lab report. The task, numbers and findings are made up to show structure; do not copy them.
Title: Determining the Extension of a Steel Wire under Increasing Load (illustrative)
Summary (written last; one short paragraph) Annotation: Contains the aim, a clause on the method, the headline result with units, and the main conclusion. It must make sense on its own. "This experiment measured the extension of a steel wire under loads from 20 N to 100 N. Extension increased linearly with load over the range tested, giving a slope of 0.061 mm/N. The behaviour is consistent with elastic extension under these loads."
1. Introduction Annotation: Why the property matters, and one sentence of aim. Do not paste the handout.
- Background on why wire stiffness matters in engineering structures.
- Objective: to measure extension against load and determine the slope.
2. Equipment and procedure Annotation: Past tense, brief, repeatable. Major items only. Mention anything done differently.
- Wire, clamps, hanger and masses, extension scale (range stated if your course asks).
- Steps: clamp, zero, load in equal increments, read extension, unload in the same steps.
- Precaution: a stated safety measure, and a note on any difficulty and how it was handled.
3. Results Annotation: Facts only. Table with units in headings; Figure 1 with labelled axes, markers and a fitted line; each introduced in the text.
- Table 1: load (N) and extension (mm), consistent significant figures.
- Figure 1: extension against load, caption "Extension of a steel wire against applied load".
- One sentence on the trend observed; formula stated once, worked example in Appendix A.
4. Discussion Annotation: Interpretation and honesty. What the trend suggests, comparison with expectation, reading error, whether the highest load fits the trend.
5. Conclusion Annotation: Answers the aim in two or three sentences. No new data.
References Annotation: Only sources you cited and checked.
Appendix A: Raw readings and example calculation Annotation: The detail a casual reader skips, but a marker may check.
For appendix practice, see appendices in academic reports.
Where technical writing meets your SIWES placement
If you worked on a practical task during placement, you can write it up the same way inside your report. The engineering logbook examples show how to record tasks as you do them, and the strong SIWES report sample shows how a finished placement report reads. A good logbook entry gives you the facts a method and results section need.
A few cautions for placement material:
- Do not invent readings or results to make a report look complete. Report what you measured or observed.
- Check confidentiality. Company drawings, client data and internal readings may not be yours to publish. Ask your supervisor what can be included.
- Your supervisor's instructions come first, including any required report template.
Laboratory-based students can also see the laboratory science report guide for placement-style lab writing.
Common mistakes in technical reports
- Copying the lab handout into the introduction or procedure.
- Unlabelled axes or missing units.
- Mixing results with opinion in the results section.
- Over-precise numbers copied straight from a calculator.
- Figures and tables never mentioned in the text.
- A summary that only describes ("this report discusses...") without giving results.
- Conclusions that bring in new data or contradict the results.
- Uncited borrowed material. The Sussex guide treats uncited sources as plagiarism, so cite as you go.
- Polishing layout before the content is right. Sussex warns that a polished layout can make a draft seem more finished than it is.
Questions a supervisor or lecturer may ask
- What was the aim, and did the results answer it?
- Why did you choose this method, and could someone repeat it from your description?
- How reliable are your readings? What are the main sources of error?
- Why does this graph show a straight line, or why does it not?
- Where did this value come from, and what is its unit?
- What would you change if you repeated it?
Practise answering them from your own appendix, not from memory of the handout.
Before you submit
- Reader and purpose are clear.
- Headings match the brief or template given by your lecturer or supervisor.
- Summary written last and stands on its own.
- Method in past tense, brief but repeatable.
- Every figure and table is numbered, captioned, has units and is mentioned in the text.
- Significant figures are consistent and justified.
- Discussion separate from conclusion; conclusion adds nothing new.
- Sources cited and checked; raw data in an appendix.
- Proofread, ideally by another person.
Where UniDraft fits in
UniDraft does not run your experiment or your calculations, and it does not replace your lecturer's template. What it does is help organise your confirmed work, checked sources and supervisor instructions into an editable Word document. When your technical write-up forms part of a placement report, start your SIWES report and review everything before submission. The free citations tool can help with reference formatting.
Sources
These pages were opened while preparing this article. They are general guidance from other countries; your department's brief overrides them.