A civil engineering SIWES report should explain the site or office work you genuinely encountered: where you trained, the project or unit, your role, the methods you observed or assisted with, and what you learned. It should trace back to your dated logbook. Do not fill the report with tests you never saw; it must explain your actual involvement.
Your institution's SIWES guide and supervisor set the chapter order, page layout and evidence requirements. Start with the general SIWES report guide and the institution format directory; use the outline below only where it fits those rules.
You have the site notes; the report needs to show the engineering work and your real contribution clearly. UniDraft helps organise the measurements, activities and guidelines you confirm into an editable SIWES document. Start your civil engineering SIWES report, then compare the draft with your logbook and permitted evidence. It does not perform tests, certify site safety or approve engineering work.
The short answer
- Build the report from an evidence list (dates, units, tasks, drawings, records, photographs), not from memory or a sample.
- Describe each technical activity the same way: purpose, sequence, tools and documents, safety step, your role and outcome.
- Label every task observed, assisted or performed under supervision, and keep that label identical in the logbook, the report and your defence answers.
- Explain drawings, tables and photographs in the text. Explain why each figure matters to the activity.
- Never state a concrete grade, bar size, chainage, reading or equipment specification you did not see recorded.
- The department's approved template wins over any outline, including this one.
Build the report from a site evidence list
Before drafting chapters, make a private list of your placement dates, site or office units, projects, tasks, tools, drawings, measurements and photographs you are allowed to use. Mark each activity as observed, assisted or performed under supervision. Compare the list with your signed logbook, and ask your industry supervisor about unclear details.
| Evidence you have | Useful report detail |
|---|---|
| Logbook entry for a site visit | Date, project area, work stage, your actual role, and what you observed |
| Approved drawing or sketch | What it represents, scale or labels where known, and how it relates to the task |
| Test or measurement record | Instrument, procedure, unit, actual reading, and who performed or approved it |
| Approved site photograph | Date or work stage, caption, permission, and explanation in the chapter text |
| Delivery note, bar schedule or material request | Material, quantity, where it was used, and who checked it |
| Site meeting or toolbox talk notes | Date, topic, decisions made, and what they meant for your task |
If an image or drawing belongs to your host organisation, obtain permission before reproducing it. Leave out client details, security-sensitive plans and private site information unless your placement explicitly authorises disclosure.
Label your involvement honestly
Check your draft for inflated involvement. "I carried out the compressive strength test" is a very different claim from "I watched the technician crush cubes and copied the load readings into the register." Both are acceptable in a SIWES report, because SIWES is a training scheme and observation is a legitimate way to learn. Only the false claim is a problem.
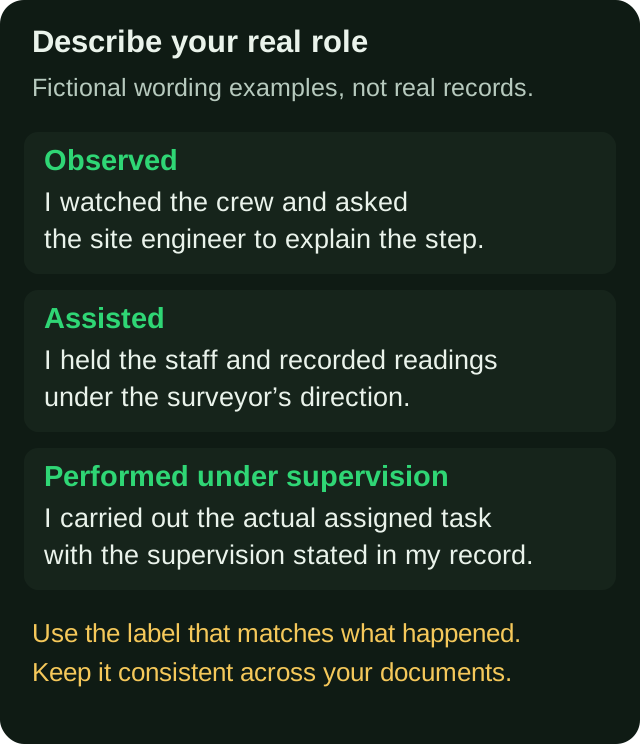
Pick the label that matches what your hands and eyes actually did. If you moved between tasks, say so per task, not for the whole placement.
A chapter-by-chapter working outline
Some departments use four chapters, others five or more, and polytechnics often have their own layout. The order below is an illustrative working outline, not a rule.
Preliminary pages. Use the exact title, certification, declaration, acknowledgements, contents and lists of figures or tables required by your department. Do not insert a supervisor signature or approval you have not received. If your front matter needs Roman then Arabic numbering, this page-numbering walkthrough shows the Word steps.
Introduction and placement context. State the approved SIWES period, host organisation, assigned unit, objectives and the scope of the report. A concise description of the company's work is useful. Copied corporate history is not a substitute for your placement experience. You can also state briefly how the scheme is meant to work: students gain practical exposure to work they only meet in theory at school.
Organisation and project setting. Explain the relevant construction project, team structure, work stage and where your unit fits. A typical site has a client, a consultant or project manager, a resident or site engineer, a foreman or supervisor, and specialist gangs for steel fixing, formwork, masonry and concrete. Draw the structure as it existed on your site, not a textbook organogram. If you moved between office design and site, show the dates and roles for each.
Technical activities. Give the actual activities enough detail to explain your role. Group real work into meaningful processes and describe each with the five-part pattern below.
Skills, challenges and conclusion. Name skills gained and problems encountered, with evidence. Distinguish a problem you solved from one you merely watched the team resolve. Recommendations should follow from actual observations and address the right party: your department, the SIWES coordinator or the host organisation.
References and appendices. Cite any standard, code or textbook you quoted. The free citation finder can help you locate real sources for APA, IEEE or Harvard style instead of guessing details. Put bulky supporting material, such as blank record sheets, in appendices.
Writing technical activities so they read as engineering
Use one pattern for every activity so a supervisor can scan and compare.
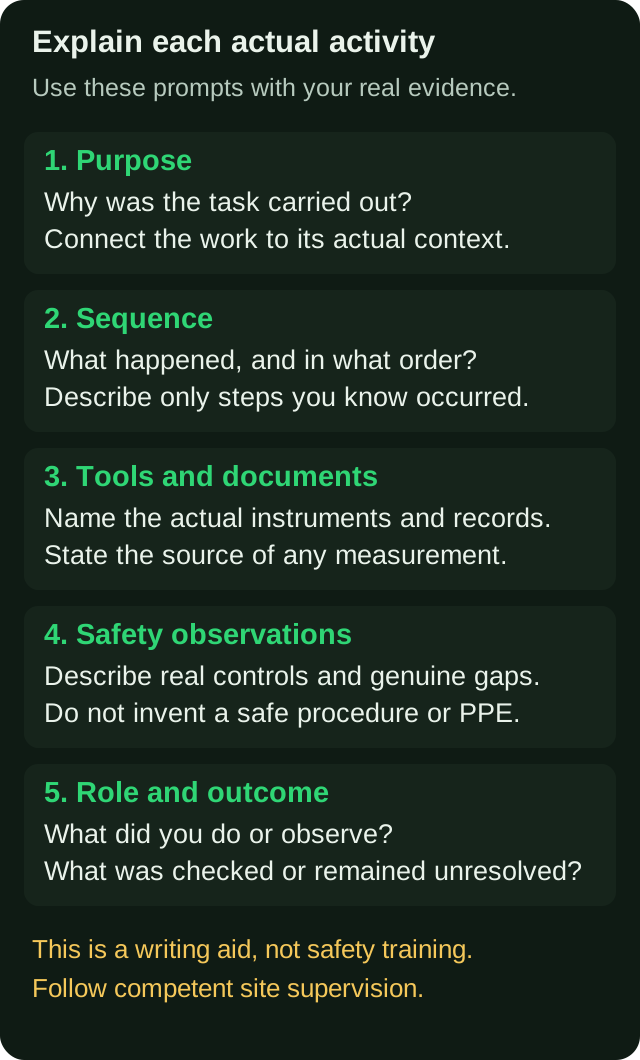
Include a process only if it happened at your placement. Civil engineering placements differ widely: one student may spend six months on a building site, another in a design consultancy drafting in CAD, another on a road or drainage contract, another in a materials laboratory. Use the placement your institution approved and explain its real tasks.
Site activities you might genuinely have seen
The list below is a menu of common activities and the detail a reader expects. It is not a list of things to claim. Use only those that appear in your logbook.
Setting out and surveying. Purpose: transferring dimensions from the drawing to the ground so that foundations, columns or road alignments sit in the right position. Typical instruments are a level and staff, a theodolite or total station, tapes and pegs or profile boards. Describe the reference point or benchmark used, how readings were booked, and how the surveyor checked closure or errors. If you only held the staff, say so.
Excavation and foundations. Describe the depth and width as shown on the drawing, how spoil was handled, whether groundwater was met, and how the base was inspected before blinding or reinforcement. The UK Health and Safety Executive stresses that excavations need supports ready before digging, edge protection and inspection by a competent person at the start of each shift; see the HSE excavations guidance. This is UK guidance, not evidence of Nigerian legal requirements. Use it as contextual reading and report what you actually saw; follow your site's competent supervision and applicable requirements.
Reinforcement. Say which element (footing, column, beam, slab), whether bars were cut and bent to a bar bending schedule, how they were fixed with tying wire, and how cover was maintained with spacers or cover blocks. Give bar diameters and spacing only if they are on the drawing or schedule you have in front of you.
Formwork. Cover the material (timber, plywood, steel), propping, alignment checks and the reason a form must be clean, tight and adequately supported before concrete is placed. Note when and how it was struck (removed), if you saw it.
Concrete production, placing and testing. Explain whether concrete was batched on site or delivered ready-mixed, how it was transported and placed, how it was compacted (vibrators or rodding), and how it was cured. For testing, describe what you observed. A slump test measures the consistency of fresh concrete; the method is set out in BS EN 12350-2, which the British Standards Institution publishes. For any strength test you observed, identify the specimen, method, actual test age and recorded result from the register, and say who performed it. Do not infer the full test procedure or pass criteria from a public catalogue summary. Nigerian projects may specify British, Nigerian or other standards, so quote whichever your specification named.
Masonry and blockwork. Block sizes, mortar mix ratio as stated by the foreman or specification, bonding, damp-proof course position and alignment checks.
Drainage and roadworks. Trench levels, pipe bedding, gradients, manholes, subbase and base layers, compaction checks and traffic management, if applicable.
Office work. Drafting in AutoCAD or similar, taking off quantities, preparing bills of quantities extracts, checking shop drawings, updating progress charts, or attending site meetings. For an approved office placement, describe what you produced and who reviewed it.
Materials laboratory work. Sieve analysis, Atterberg limits, compaction tests or aggregate tests, each with the instrument, procedure summary and result you actually recorded.
A short illustrative example
The paragraph below is a made-up sample showing the pattern. It describes no real student, site or result. Replace every detail with your own verified records.
Illustrative only. During the week of foundation works, I observed the setting out of column positions using a total station operated by the site surveyor. The purpose was to transfer the grid shown on the architectural and structural drawings to the ground so excavation could begin at the correct position. The surveyor set up over a known reference point, back-sighted to a second point, and marked the column centres with pegs. I held the prism pole and recorded the readings he called out in the field book, which he then checked. Before work began, the site supervisor reminded the team to wear helmets, boots and high-visibility vests and to keep clear of the excavator. I assisted; I did not set up or adjust the instrument. What I learned was that a small setting-out error at this stage carries through the whole structure.
Notice what it does: it states the role plainly, links purpose to the drawing, names the safety step, and closes with something learnt. It also stays short enough to leave room for a labelled photograph or sketch.
Safety, ethics and site practice
Site work can involve serious hazards. This writing guide is not safety training or authorisation to perform a task; follow competent supervision, site instructions and applicable requirements. Do not write a decorative "safety" paragraph copied from the internet. Instead, describe what your site actually did:
- PPE. Helmets, safety boots, high-visibility clothing, gloves, eye or ear protection as the task required. The HSE PPE overview explains that PPE may be needed for risks remaining after engineering controls and safe systems of work. This is UK contextual guidance; describe the actual controls and training at your site.
- Hazard control. Barriers around excavations, scaffold checks, safe access, storage of materials, and separation of pedestrians from plant.
- Communication. Toolbox talks, permits for specific work, incident reporting.
- Your own conduct. Whether you were inducted, what you were allowed to touch, and who supervised you.
Also treat professional ethics as part of the report. Identify who was authorised to review or approve the work you observed; do not claim that responsibility yourself. The COREN website is an official starting point for engineering-regulation information. Confirm any registration or approval requirement with an appropriate institutional or professional contact rather than inferring it from a sample report.
Keep report, logbook and defence consistent
Pick three substantial technical claims in your draft and trace each to a dated logbook note, permitted evidence, or a detail your supervisor can confirm. Check dates, units, figure numbers, organisation names, and whether your claimed role matches your actual role. The engineering logbook examples guide shows how to record site work honestly, and how to fill your SIWES logbook covers the weekly routine that keeps entries specific.
Practise explaining process questions such as: why was the cover maintained, what happens if the slump is too high, how was the level transferred? You can answer only what you saw. How to defend your SIWES report walks through the questions and how to answer without bluffing. If you are unsure how the mark is split between logbook, industry supervisor and report, read how SIWES is graded; it varies by institution.
Common mistakes supervisors flag
| Mistake | Why it fails | Fix |
|---|---|---|
| Copying a strength, mix ratio or bar size from a sample | No traceable evidence for the stated value | Use only values from your records; otherwise describe the process without numbers |
| "I supervised the concreting" without actually doing so | Misstates your role | State what you actually did: observed, assisted, recorded |
| Photographs with no explanation | Reads as padding | Caption each, refer to it in the text, say what it shows |
| Long company history | Not your training experience | Follow the required length and focus on your training |
| Report activities that are absent from the logbook | Contradiction between documents | Clarify the genuine record with your supervisor and follow the approved correction process; never fabricate an entry or signature |
| Confidential drawings pasted in full | Breaches host organisation rules | Confirm permission and privacy/security requirements for extracts and original sketches too |
| Safety as a generic paragraph | Does not explain the actual site or task | Describe real relevant controls, gaps and uncertainty |
If a supervisor returns your draft with comments, keep your earlier versions and log what changed. Managing IT and SIWES report corrections explains how to do that without losing earlier work.
Planning your writing timeline
Do not leave the report until the last week of the placement. Adapt this planning sequence to your actual deadline and required review process:
- During the placement: update the evidence list weekly, ask permission for photographs early, and keep a small notebook for readings and sketches.
- Final two weeks on site: clarify dates, unit names and specifications while they can be checked. Obtain endorsements on the required schedule rather than first seeking them at the end.
- First week back: draft the technical activities chapter, using your checked evidence while the details are fresh.
- Second week: write the remaining chapters, build lists of figures and tables, and add references.
- Before submission: run through the submission checklist for IT reports, check the page layout, then have your supervisor review it.
If your school issues SIWES forms, remember the report is only part of the paperwork; what SIWES Form 8 is explains one of the forms students commonly confuse with the report.
Pre-submission checklist
- Every activity is present in the logbook and labelled observed, assisted or performed.
- Every number (grade, size, reading, quantity) is on a record you can produce.
- Every figure is numbered, captioned, permitted and referred to in the text.
- Relevant safety controls, gaps and uncertainty are described from real observations.
- Chapter order, headings and length match your department's approved guide.
- Fonts, spacing and margins match the rules; the free formatting checker reads a .docx and flags mismatches against your university's rules without storing the file.
- Front matter has no signature or approval you have not received.
- References are real and formatted consistently.
Mechanical and workshop-based students will find the same approach in the mechanical engineering SIWES report guide, and the closing chapter is covered in how to write the SIWES report conclusion and recommendations.
Where UniDraft fits in
UniDraft builds the written IT/SIWES report as an editable Word (.docx) document around the placement facts you confirm and the guidelines you supply. Supervisor instructions and student-confirmed guidelines take priority over general departmental and university patterns. Review activities, results, drawings and references against your actual evidence. UniDraft does not fill your official logbook or Form 8, provide approvals or find you a placement. If your supervisor sends corrections, you provide them, confirm the extracted changes, and a new version is produced while earlier versions are kept.
Review the current price and included correction allowance in the document workflow before paying. You still supply and confirm the site activities, measurements, drawings and approvals, and must be able to explain your actual involvement. You can compare your university's rules first with the free format guides.
Sources
- Council for the Regulation of Engineering in Nigeria (COREN): official starting point for engineering-regulation information; confirm applicable requirements with an appropriate institutional or professional contact.
- HSE: Excavations: UK guidance on excavation supports, edge protection and inspection.
- HSE: PPE overview: UK guidance on PPE and remaining risks after other controls.
- BSI: BS EN 12350-2 slump test: scope of the standard method for the slump of fresh concrete.